

![]() To record that a Client will be Off-Service, open the
Off-Service screen and select the Add button.
To record that a Client will be Off-Service, open the
Off-Service screen and select the Add button.
The Off-Service Wizard will open, allowing you to capture the Off-Service Type, the start and end dates/times (though you can leave the End Date/Time blank if you wish) and any Notes relating to the Off-Service. The status is automatically set to Approved as Clients do not need approval for Off-Service.
You can also record the Leave Unit, which can be defined as Days or Hours, and the system will then automatically calculate the number of days/hours that the Client will be Off-Service for. You can manually overwrite the number of Units taken during this period if you wish.
Once you have captured information relating to the Off Service Period, click on the Add button.
![]() The newly added Off-Service record will appear in the grid
below, and you can then add another Off-Service record if you wish. You can add
as many Off-Service records at once if you wish. If you have made a mistake
with the details capture, simply select the record from the grid and click on
the Edit button. From here you can make any changes to the Off-Service record
you wish.
The newly added Off-Service record will appear in the grid
below, and you can then add another Off-Service record if you wish. You can add
as many Off-Service records at once if you wish. If you have made a mistake
with the details capture, simply select the record from the grid and click on
the Edit button. From here you can make any changes to the Off-Service record
you wish.
If you wish to remove this record, simply select the record and click on the Remove button. The next screen in the displays a list of all Scheduled Tasks for this Client during the period that the Client will be Off-Service. All of these Tasks are automatically Cancelled by the system due to this Client being Off-Service.
From this screen we can also see the Clients Supervisor and the Group the Client is linked with.
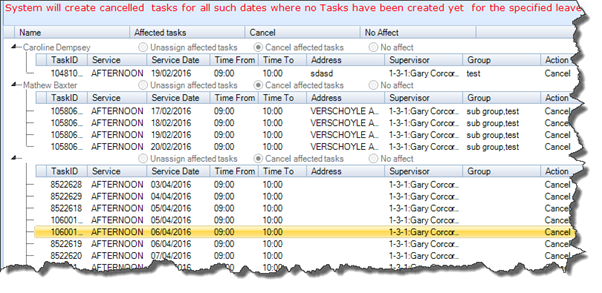
Clicking the Next button on the Off-Service Wizard will bring you to the next step in the process of capturing this record. This screen, presents to you, a list of all Carers who had been assigned to these Tasks that have now been cancelled due to the Client being Off-Service.

Here we can see the names of the Carers affected by these Cancelled Tasks, the total number of Tasks that were assigned to them and now cancelled and the total number of hours for each Carer that were cancelled due to the Off-Service record.
The facility to send these Carers an SMS or Email notifying them of this cancellation is also available on this screen.
The final screen on the Client Off-Service Wizard allows you to set a Reminder. Here you can define the Reminder date and time along with capturing any notes required.
You can also define what User Roles on the system are will get the Reminder, but also if you wish just for individual Users to get this Reminder this can be done by selecting the Assign Users icon that appears beside the User Roles in the reminder screen below.

You can capture multiple reminders on one Off-Service record if you wish. At any time throughout the Off-Service Wizard you will also have the option of adding a document to the Off-Service record. The Docs button appears at the bottom of the screen and to upload a Document to an Off-Service record, click on the Docs button; from here you can browse your local machine and upload a Document to the application.
Once you have entered the information, click the Finish button and the Off-Service details will appear in the main screen, as shown in the screenshot below:
 You can view the Off-Service period on this screen
in either List View or Calendar View. The List View gives full details of the
Off-Service records captured on a Clients Profile.
You can view the Off-Service period on this screen
in either List View or Calendar View. The List View gives full details of the
Off-Service records captured on a Clients Profile.
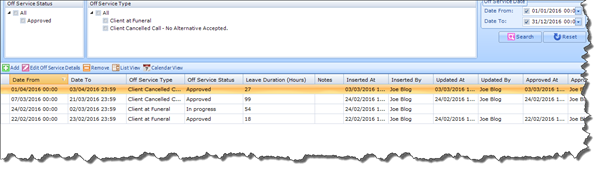
Here we can see the following information relating to Off-Service records:
|
§ Start Date and Time § End Date and Time § Off-Service Types § Off-Service Status
|
§ The Off Service Duration in Hours § Notes § Inserted At § Inserted By
|
§ Updated At § Updated By § Approved At § Approved By
|
Calendar View illustrate the Off-Service Record as illustrated below.
![]()
From this interface we can see:
§ The Off Service Period
§ Off Service Type
§ Off Service Status